Background:
For those not familiar with how colour astro-images can be created,
some background can be found here
and here.
In summary, monochrome CCD/CMOS cameras offer greater
sensitivity than colour ones, and an astro-photographer can take multiple shots
through red, green and blue filters and then combine this data to obtain
detailed “true colour” RGB images of faint astronomical objects.
Emission nebulae radiate light strongly at the “hydrogen
alpha” (Ha) wavelength, a
very specific frequency of red light.
Imaging emission nebulae though a “narrowband” filter (one that only
allows the passage of Ha light) excludes other frequencies of light, particularly light
from sources such as suburban light pollution or moonlight. This greatly increases the contrast of the
image and allows details of faint nebulous objects to stand out from the
background sky.
Monochrome Ha images of emission nebulae are often far more detailed than
their RGB equivalents, but it is possible to combine the two in order to get
the twin benefits of both detail and
colour.
However, it seems that whatever software you use, working
out how to combine Ha data with RGB data to
make detailed colour images still remains a perennial problem for many
astro-imagers. The monochrome Ha images are often brighter and denser than the
RGB images, and a straight luminance combination of the Ha layer with the RGB usually results in a
washed-out greyish-pink nebula with oddly-coloured stars.
Adobe PhotoShop has, until quite recently, been the software
tool of choice for astro-image processing and there is a wealth of information on its
use for that purpose. Unfortunately,
Adobe have gone over to a “renting” model, which involves forking out an
extortionate monthly sum to use it, rather than owning your own copy outright. Another modern alternative is Pixinsight,
which again is an extortionately-priced package with an incomprehensible user
interface.
There are other solutions (some of them free) but I (Luddite
that I am) still use a combination of AstroArt (version 4) and PaintShop Pro
(version 7) to handle the image data generated by my set-up. These are very old bits of software, although
up-to-date versions are available.
I have been using them in combination for around 15 years
and in that time have developed processing methods that get reasonable results,
so I see no reason to change until forced to update by Mr. Gates.
Ha/RGB combining in PSP:
Ha/RGB exposures:
I try to shoot as many Ha subframes as I can in a single evening
(because in the UK ,
the next clear night will be a month away) with the length of exposure governed
by conditions and the brightness of the target. I usually take a single exposure of 300 seconds, and take it from
there. Poor seeing means I may bin
exposures 2x2. Good seeing lets me go up
to around 600s exposures, but that seems to be the limit at full resolution
from my suburban location, even in Ha. Background light pollution is the problem.
For RGB, I always bin 2x2, usually at or near the same
exposure length as the Ha sub-frames. My Vixen scope is an achromat, so
non-narrowband data is never going to be brilliant. Blue stars tend to be a bit bloated but that
doesn’t matter too much, as will be seen. I like a minimum of 12 subs per colour to beat down the noise, though
binning seems to help as well in that respect.
Pre-processing:
Ha subframes are stacked using
the pre-processing function in Astroart.
With the very low noise of the Atik 460, dark frames are not needed -
setting the “hot pixel” filter to 70% seems to give me better results than dark
frames (which sometimes leave dark spots or lines on the final stacked
images). Stacking parameters are set to
the “sigma combine” (which wipes out the inevitable aircraft trails) and “all
star” alignment functions, with everything else at default. Astroart stacking is not very good if your
polar alignment isn’t good, but since I have been using a permanent set up, I
haven’t had a problem. AA will accurately
align and calibrate 30 full frame ATIK 460 subs in less than a minute, even on
my ten-year old XP laptop.
I have a library of flats for each of my RGB, Ha
and OIII filters, but to be honest I don’t use them unless I can see obvious
dust bunnies or edge artefacts in the final stack. Even then, I find that the Ha
flat seems to work for everything.
Post-stacking processing:
Depending on the object, for the Ha a
bit of “digital development” (DDP) or deconvolution (with a Gaussian core) can
be used to tighten up the stars, followed by slight stretching (linear or
logarithmic, depending on what look best).
The “black point” is set by pulling up the histogram and parking the
left hand slider just to the left of the “cliff”. If there are enough subs, noise reduction is
not needed at this stage, and usually not at all.
When I have a reasonable-looking Ha image, I save it as a FITs file.
I do the same for each of the red, green and blue stacks,
but don’t bother with any processing beyond the initial stacking. Instead, the AA image registration function is
used to perfectly align the blue and green stacks with the red one, using the
“blink” option to confirm that the stars are all perfectly aligned. This is critical if you don’t want weird
asymmetrical haloes around your stars, and often the longest part of a session is
spent getting this bit right. I'm told that DeepSky Stacker is good at this but I have never tried it.
Once registered, a RGB image is generated by using the RGB combine function in AstroArt. The colour levels and contrast can be adjusted and it is important to try and get a bright, well-saturated RGB image without too much flaring around the brighter stars or odd background colours. The RGB images is then resized by 200% (it was binned) and then saved as a JPEG at maximum
resolution before exporting to PaintShop Pro for star reduction and cleaning up. I would use the TIFF format, but AA won’t
recognise TIFFs once they have been saved in PaintShop, which is a bit
aggravating.
Some crude and fairly brutal star reduction is then applied. This
is done by setting the “magic wand” to a brightness tolerance of about 100 and
a feather of 2 pixels, and clicking anywhere but on a star. Provided the nebulosity is not too bright (it seldom is in
RGB), this will select all of the background around the stars.
The selection is then inverted and expanded by 3 or 4
pixels. This effectively selects all of
the stars in the field.
Clicking the “erode” function under the “Effects” >
“Edge” option shrinks the selected stars dramatically.
One or two clicks is enough. This
is crude and can sometimes turn the stars slightly diamond shaped. This isn’t too important but a wider
expansion once inverted can sometimes reduce the effect.
Deselect all the stars and then individually reselect the
remaining larger stars (holding down the shift key whilst using the magic wand
allows you to select multiple objects).
Again, expand the selections by a few pixels and “erode” until
the selected larger stars are smaller and still circular. I try and get the medium-sized stars to approximately the
same size as the Ha frame. I don't mind a bit of flaring around the larger stars carrying into the final image as I quite like the effect.
Noise reduction is then applied. The Effect > Noise > Edge Preserving Smooth option, with the “amount of smoothing” value set 3 or 4, seems to work quite well in most cases. Finally, apply a Gaussian blur (usually around 1.5) to soften the image prior to combining with the Ha frame.
All of this is quite destructive in terms of fine detail,
but it doesn’t matter too much as the detail will be coming from the Ha frame. This is where most of the colour contrast in the final image comes from though, so I often return to this point and change the colour balance and brightness of the RGB master frame, depending on what the final outcome from the next steps are.
Once the RGB frame been hammered into shape, it is taken back into AA. The Ha frame is then also opened in AA and registered to the RGB frame, again taking pains to confirm that the stars are accurately aligned. Both are then saved as JPEGs and taken back into PaintShop.
Noise reduction is then applied. The Effect > Noise > Edge Preserving Smooth option, with the “amount of smoothing” value set 3 or 4, seems to work quite well in most cases. Finally, apply a Gaussian blur (usually around 1.5) to soften the image prior to combining with the Ha frame.
 |
| RGB master |
Once the RGB frame been hammered into shape, it is taken back into AA. The Ha frame is then also opened in AA and registered to the RGB frame, again taking pains to confirm that the stars are accurately aligned. Both are then saved as JPEGs and taken back into PaintShop.
In PaintShop, a mild unsharp mask can be applied to any
interesting areas in the Ha image (in this example I
sharpened the Bok globs) and a gentle (too high a value will "posterise" nebulosity and dark edges) edge-preserving smooth can
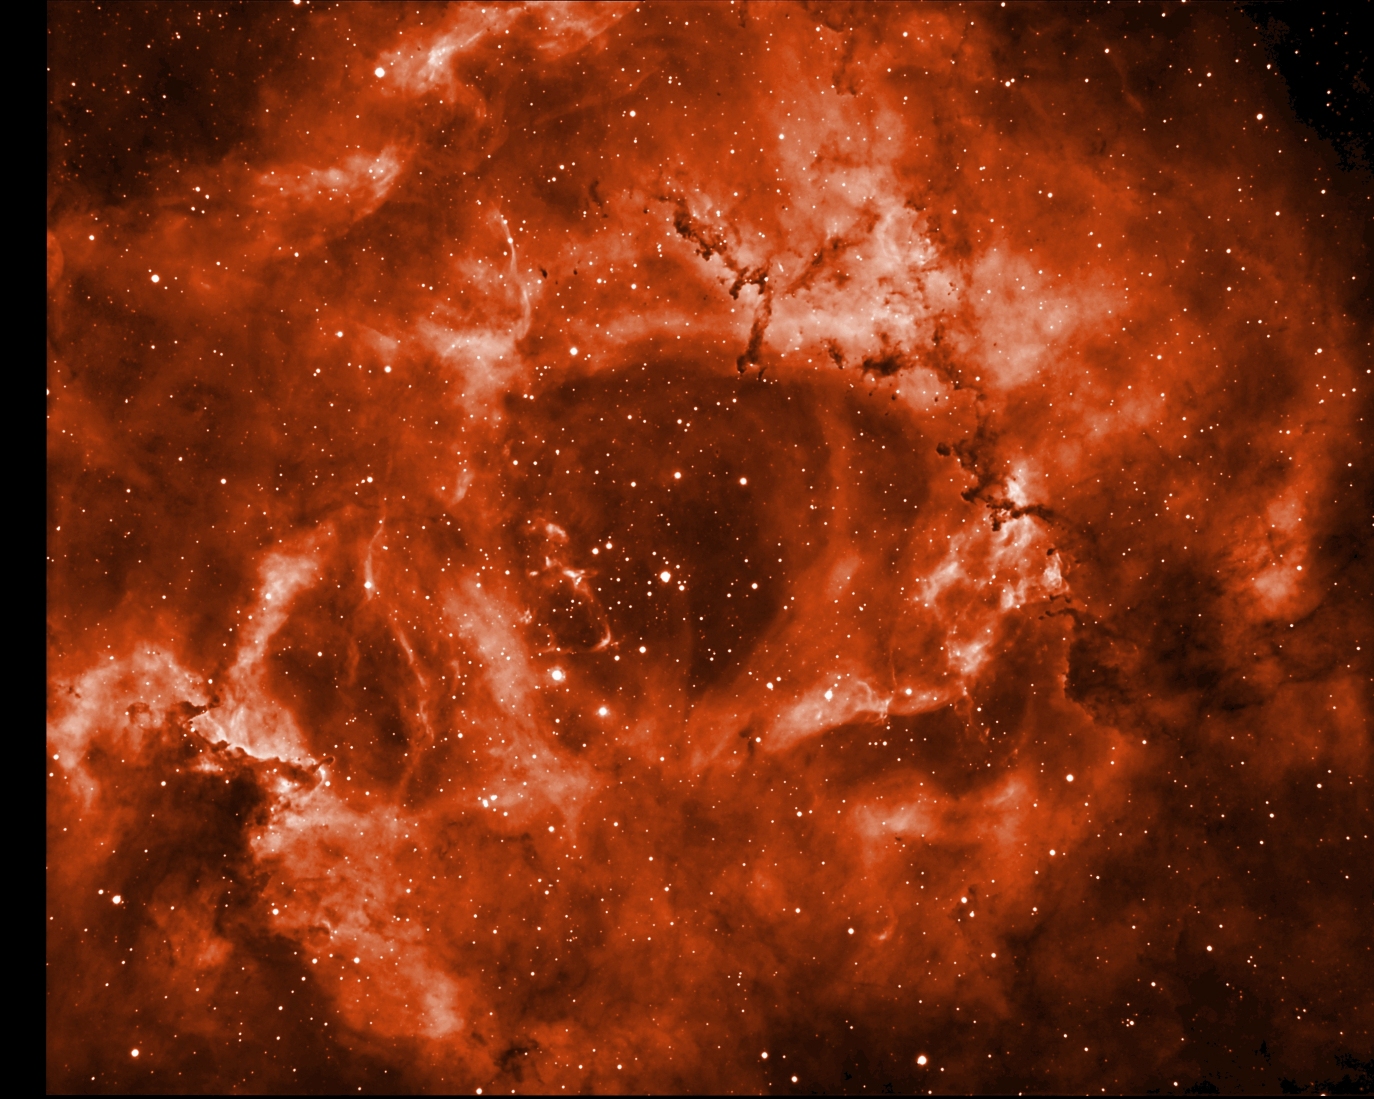
also be used to flatten out any background noise. On objects like the Rosette, which have a
wide dynamic range between the bright and dark areas, the “clarify” function can
also improve the image contrast, flattening out the lighter areas that would
otherwise “burn out” the colour when the RGB is added in.
To avoid the wishy-washy pink tinge when Ha
is added directly as a luminance layer to RGB data, I colourise the Ha
frame first. This is a three-part
process.
 |
| Master Ha frame |
First, copy the Ha image and flood-fill it with a solid red
colour (I used a red reference that I made by placing a Ha
filter on a flat-bed scanner and recording its colour). Paste the monochrome Ha frame over that and combine with the colour layer in “hard light” mode. This gives a red nebula with white stars, but with some whitish “burnt out” areas.
Then make a second Ha/red layer
stack, but combine in “multiply” mode to give a solid red nebula with red
stars. This is usually a bit dark, so
using the “dropper tool”, measure the RGB value of a point near a star in an
averagely bright area of the nebulosity, and raise the contrast/brightness of
the “multiply” image until it matches the brightness of the same area in the
“Hard light” image.
Then layer the “Hard Light” image on top of the “Multiply”
image in “normal” mode. Using the
“Eraser” tool (it depends on the features being treated but I usually use a
size of around 200, a hardness of 10-20 and an opacity of 5-10 in the “tool
options” setting) I then carefully rub out any whitish areas to bring through
the underlying darker details. If the
brightness of the two layers have been reasonably well-matched, this gives a
much more natural look to the red nebula without any obvious artefacts.
Some of the stars near the erased areas will be set back to
red by this. To get around this, take another
copy of the original Ha image and use the curves to lower the brightness of the image
so that only the stars can be seen. Then
apply a Gaussian blur (a tool setting of about 1 will do), and paste this as a
layer over the red nebula frame in “lighten” mode. This restores the white to the stars.
 |
| Ha master layered with red mask - hard light |
 |
| Ha master layered over red mask - multiply mode |
 |
| "Hard light" image layered over "Multiply" image in normal mode, white areas erased |
Merge the layers of the red nebula
image and save. This should now be a red,
contrasty nebula showing plenty of detail, with white stars...
Take the master RGB colour frame and paste over the final colourised Ha image in
“lighten” mode. This gives a (usually)
pleasing colour image, where the RGB colours
show through into the red nebulosity with none of the usual wishy-washy
pinkness.
If the stars still seem a bit
bloated, the monochrome Ha master frame can now be pasted over the HaRGB frame as a luminance layer (anywhere
between 50-90% seems to work) without washing out the colour too much. This further improves detail and shrinks the
stars.
The image is now pretty much
done, bar cosmetic cropping and minor contrast and colour adjustments. In this example, I cropped out the stacking frame edges and slightly
altered the contrast and the colour balance using “curves”to give the final
image. When I can't get a satisfactory colour or contrast balance just by tweaking the final blend at this point, I go back to the RGB image and adjust that, and then layer the new version in to my colourised Ha frame as above. Often I'll combine different versions of the same image to get one I like, but I think a colourised Ha frame gives a good base from which to work from.
There may be easier ways to
achieve the same end, but it all seems to work for me. Obviously, the individual tool settings and
layer levels for each of the actions can be varied to get the best-looking
results, but the basic “work flow” (to steal some Pixinsight jargon) seem to
work for the nebulous objects I have recently tried it on.
 |
| Stars restored - final colourised Ha frame |
 |
| RGB master layered over final colourised Ha frame - lighten mode |
 |
| Ha master layered over HaRGB frame |
 |
| Final image |
No comments:
Post a Comment